Component Interaction
In modern websites, a page can have many components and they interchange their information frequently. There are many scenarios in which two or more components share information. There are 4 ways to exchange information between components.
- Using
CascadingParameterto pass parameters from one of the parent components to the child component. One-way notifying. - Using
Parameterto pass parameters from the from the closest parent component to the child component. One-way notifying. - Combining
Parameteranddelegateto notify changes from the child component. Two-way notifying. - Using a service to share information across many components regardless of their relations. Two-way notifying.
You can download the example code used in this topic on GitHub.
Passing data from parent to child with CascadingParameter
CascadingParameter is good if you want data from beyond direct parent to the child. This image illustrates of CascadingParameter.

CascadingParameter can be used to pass parameters from an ancestor component to the descendant components. Any changes that occur in the descendant components will not notify the ancestor component but any changes that occur in the ancestor component will notify the descendant component.
Declaring the ancestor component
- Create a property to pass to the descendant component. This property must be public property. Otherwise, it cannot be passed on.
public Lamp MostSellLamp { get; set; } = new()
{
    Name = "Best lamp",
    Price = 9999
};
- Pass property as a cascading parameter.
<CascadingValue Value="MostSellLamp">
    <LampList></LampList>
</CascadingValue>
Declaring the child component
- Create a property for with
CascadingParameterattribute.
[CascadingParameter]
public Lamp BestLamp { get; set; }
- Use it as a local property.
<h3>LampDetail</h3>
<div>Best lamp name: @BestLamp.Name</div>
<div>Best lamp price: @BestLamp.Price</div>
Multiple cascading parameters
CascadingParameter distinguish parameters by their type. This is the reason we can have 2 different names in the previous example: the ancestor parameter name is Lamp and the descendant parameter name is BestLamp and Blazor Server still recognizes them. When you pass 2 parameters of the same type without naming them, Blazor Server will chose the closest <CascadingValue> with them same type to pass it to the descendant. To get both parameters, you have to name them differently.
- Create another parameter.
public Lamp WorstSellLamp { get; set; } = new()
{
    Name = "Worst lamp",
    Price = 2021
};
- Pass both properties with their names.
<CascadingValue Value="MostSellLamp" Name="GoodLamp">
    <CascadingValue Value="WorstSellLamp" Name="BadLamp">
        <LampList></LampList>
    </CascadingValue>
</CascadingValue>
- Receive both parameters in the descendant.
[CascadingParameter(Name = "GoodLamp")]
public Lamp BestLamp { get; set; }
[CascadingParameter(Name = "BadLamp")]
public Lamp WorstLamp { get; set; }
- Use it as local properties.
<div>Best lamp name: @BestLamp.Name</div>
<div>Best lamp price: @BestLamp.Price</div>
<div>Best lamp name: @WorstLamp.Name</div>
<div>Best lamp price: @WorstLamp.Price</div>
Passing data from parent to child with Parameter
Parameter is a good choice if you want to pass a parameter from the parent component to the child component. This image illustrates of Parameter.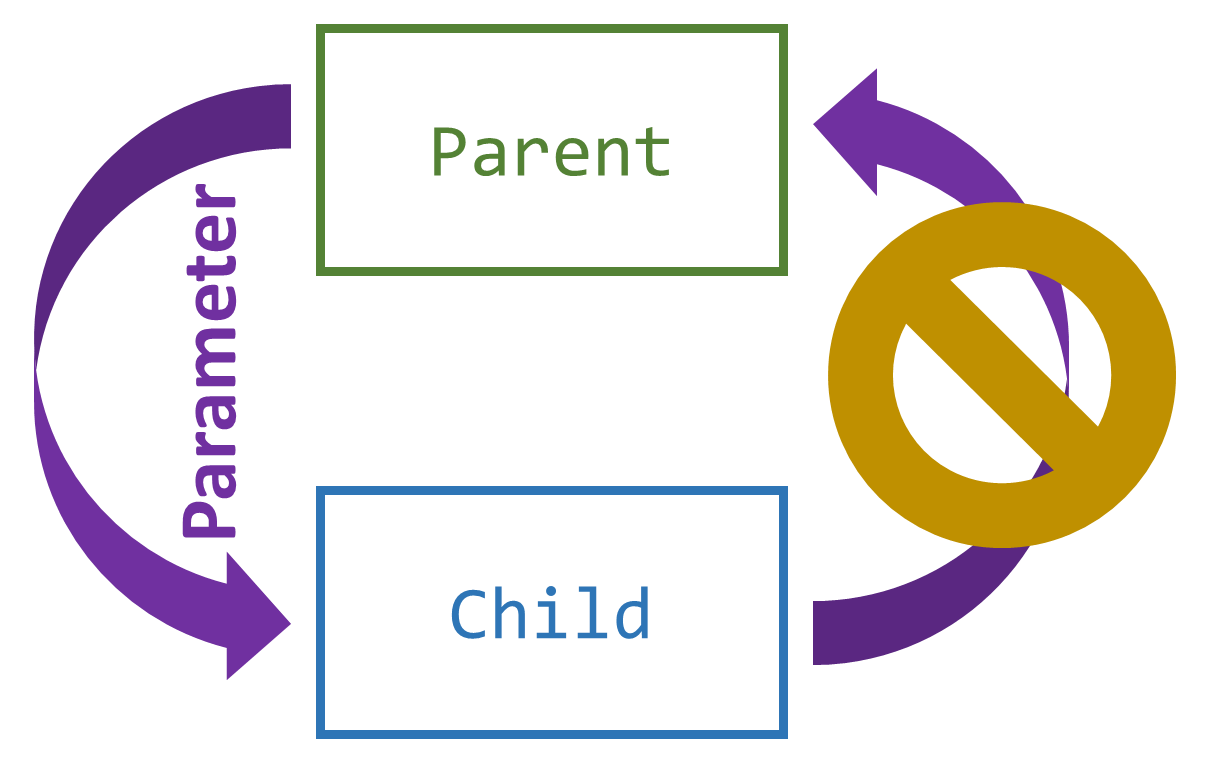
Parameter can be used to pass parameters from the parent component to its child components. Any changes that occur in its child components will not notify the parent component but any changes that occur in the parent component will notify the its child components.
In the child component, the property has been passed as a reference to the parent's property. If you change the property's reference to a new object, it will not affect the parent's property. If you keep the reference to the parent's property and only change the value inside it, you will also change the parent's property values; Although the parent's property has a new value, Blazor Server will not render it, you will have to tell Blazor Server to render the parent component again to see the new value.
- Declare a property with
Parameterattribute within the child component.
[Parameter]
public Hardware Hardware { get; set; }
- Create a property to pass to the child component. Like the
Cascading Parameter, this property must be public.
public List<Hardware> Hardwares { get; set; } = new()
{
    new()
    {
        Name = "Mainboard",
        ProduceDate = new DateTime(2021, 4, 20)
    },
    new()
    {
        Name = "GPU",
        ProduceDate = new DateTime(2022, 1, 1)
    },
    new()
    {
        Name = "CPU",
        ProduceDate = new DateTime(2021, 6, 19)
    }
};
- Pass the property to the child component.
@foreach (var hardware in Hardwares)
{
    <HardwareDetail Hardware="hardware"></HardwareDetail>
}
- Inside the child component, use the passed property as a local property.
<div>Name: @Hardware.Name</div>
<div>Produce Date: @Hardware.ProduceDate</div>
Processing passed parameter in child component
With the previous example, any changes that come from the child component will change the value of the parent component but Blazor Server won't re-render the parent component until something triggers the render process. One of the common ways to trigger the render process is to call StateHasChanged() method.
Setting the default value
In .NET 5, required parameter for a component is not supported. All component parameters are optional. In the child component, you cannot change the reference of a property but you can give default value for it as soon as you declare the property.
[Parameter]
public Phone Phone { get; set; } = new()
{
    Name = "Default name",
    BatteryPercentage = 50
};
Changing the value
Parameters passed from the parent component are reference properties. Therefore you can change its value but not its reference.
Change value the wrong way:
// You must not change the reference of a parameter
//Phone = new()
//{
//    Name = "ROG Phone 2",
//    BatteryPercentage = 50
//};
Change value the right way:
Phone.Name = "ROG Phone 2";
Phone.BatteryPercentage = 50;
If there is a nested object, then you must not change its reference either.
Combining Parameter with delegate
You can combine Parameter attribute with delegate to pass parameter from the parent component to the child component and receive notifications when the child component updates its value. This image illustrates the combination.

- Declare a property and at least one method to pass to the child component within the parent component.
public Phone Phone { get; set; } = new();

public void Render()
{
    StateHasChanged();
}

public async Task RenderAsync()
{
    await InvokeAsync(() => StateHasChanged());
}
This is a simple method that tells Blazor Server to render whenever the child component invokes it. You can have a complicated process with those methods, even returns a value to pass to the child component.
- Create respective properties to receive the passed parameters within the child component.
[Parameter]
public Phone Phone { get; set; } = new()
{
    Name = "Default name",
    BatteryPercentage = 50
};
[Parameter]
public Action OnUpdatePhoneValue { get; set; }
[Parameter]
public Func<Task> OnUpdatePhoneValueAsync { get; set; }
- Invoke the passed delegates when the child component changes its value.
...
<input type="text" value="@Phone.Name" @oninput="OnNameChanged" />
<input type="range" min="0" max="100" value="@Phone.BatteryPercentage" @oninput="OnBatteryChanged" />

@code {
    ...
    private void OnBatteryChanged(ChangeEventArgs arg)
    {
        Phone.BatteryPercentage = Convert.ToDouble(arg.Value);
        OnUpdatePhoneValue?.Invoke();
    }

    private void OnNameChanged(ChangeEventArgs arg)
    {
        Phone.Name = arg.Value as string;
        OnUpdatePhoneValueAsync?.Invoke();
    }
}
Sharing information by service class
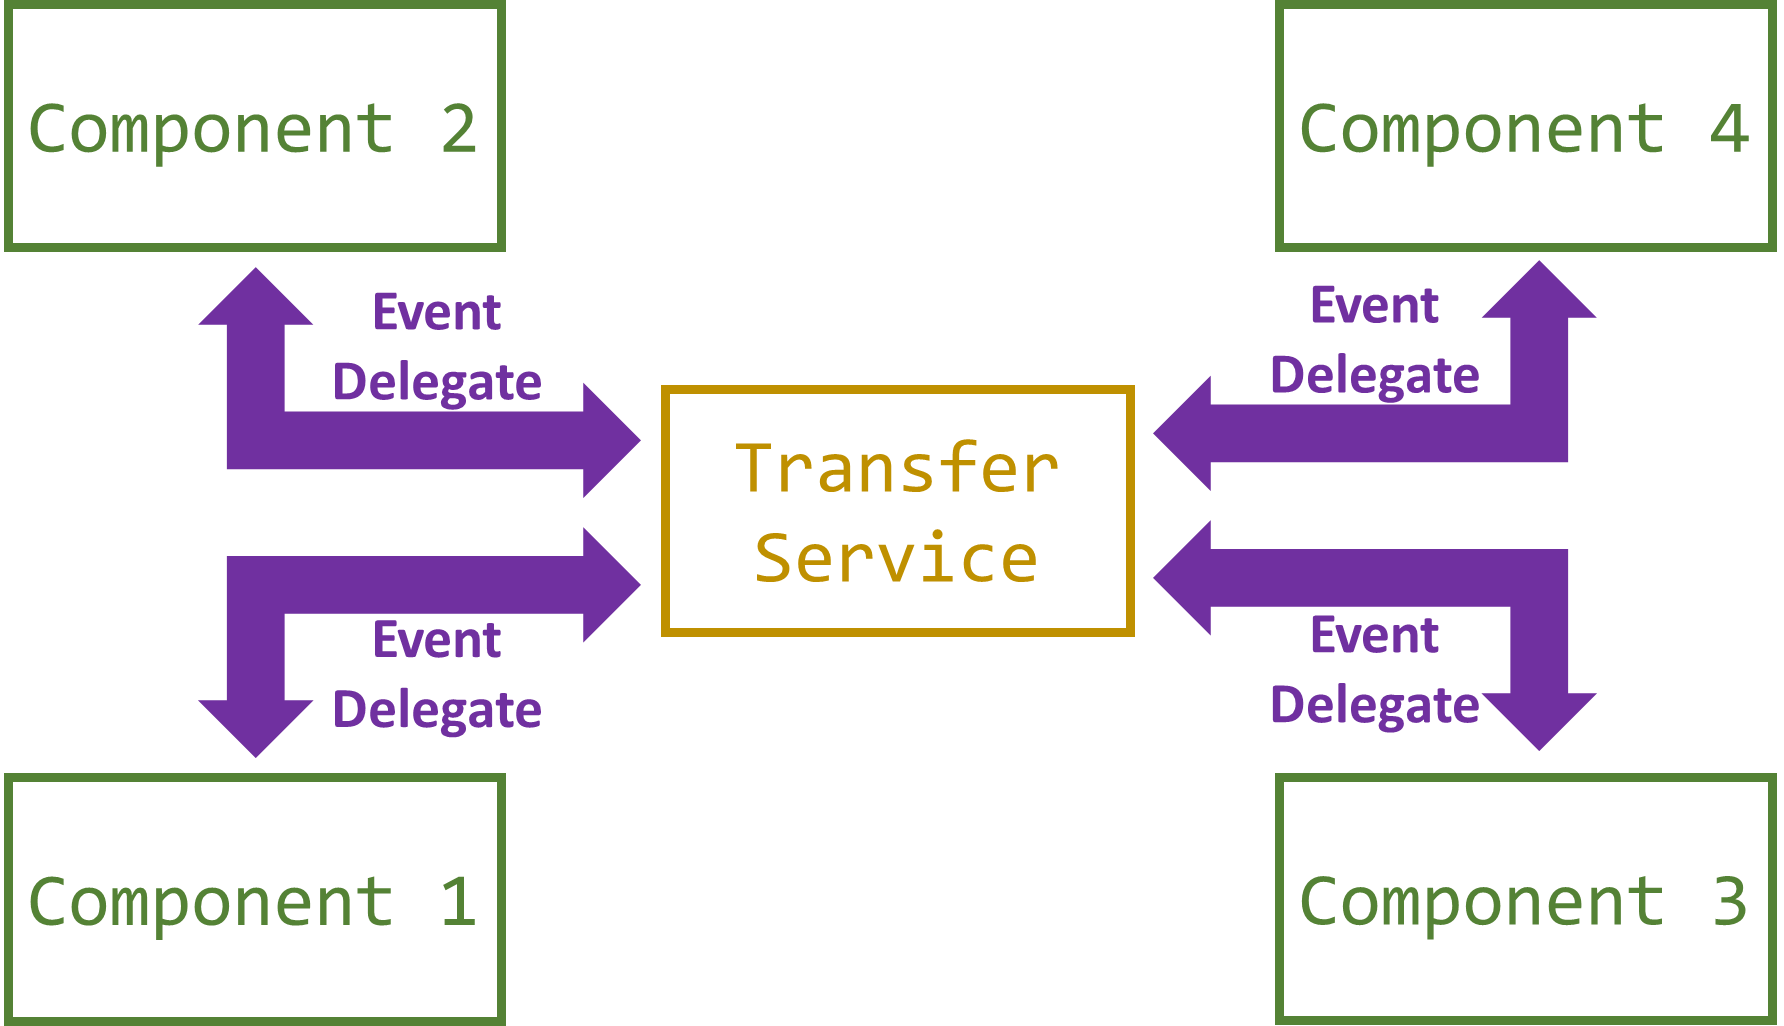
Creating the transfer service
In order to share data between components, you first need to create a scoped service.
- Add a new class
StoreIndexTransferServiceto theDatafolder (or you can create a new folder for the transfer service).
public class StoreIndexTransferService
{
    private List<Game> _games = new();
    private Game _selectedGame = new();

    public List<Game> Games
    {
        get => _games;
        set => _games = value;
    }

    public Game SelectedGame
    {
        get => _selectedGame;
        set => _selectedGame = value;
    }
}
You will need a full property here because later on, you will have an event attached for each of these properties.
- For each property you have declared, create a delegate and an event for the property.
public delegate void OnGamesChangedEventHandler(object sender, List<Game> games);
public event OnGamesChangedEventHandler OnGamesChanged;
public delegate void OnSelectedGameChangedEventHandler(object sender, Game game);
public event OnSelectedGameChangedEventHandler OnSelectedGameChanged;
A delegate should have 2 parameters, the former parameter is the caller of the event and the latter is the data sent to the event handler.
- Invoke the event handler inside the setter method.
public List<Game> Games
{
    ...
    set
    {
        _games = value;
        OnGamesChanged?.Invoke(this, value);
    }
}

public Game SelectedGame
{
    ...
    set
    {
        _selectedGame = value;
        OnSelectedGameChanged?.Invoke(this, value);
    }
}
- Register the transfer service in
Startup.cs.
public void ConfigureServices(IServiceCollection services)
{
    ...
    services.AddScoped<StoreIndexTransferService>();
}
Using the transfer service
Once you have your service set up, you can use it in any component.
- Inject
StoreIndexTransferServiceand implementIDisposableinterface in the component.
@inject StoreIndexTransferService StoreIndexTransferService
@implements IDisposable
- Declare methods to handle events from
StoreIndexTransferService. The parameters of those methods must be the same as the delegate.
// Method Handler for public delegate void OnGamesChangedEventHandler(object sender, List<Game> games);
private void OnGameListChangedHandler(object sender, List<Game> games)
{
    StateHasChanged();
}

// Method Handler for public delegate void OnSelectedGameChangedEventHandler(object sender, Game game);
private void OnSelectedGameChangedHandler(object sender, Game games)
{
    StateHasChanged();
}
- Set default values and subscribe events.
protected override void OnInitialized()
{
    StoreIndexTransferService.Games = new()
    {
        new()
        {
            Name = "The advanture of Sinbad",
            Price = 22
        },
        new()
        {
            Name = "DotA 2",
            Price = 0
        }
    };
    StoreIndexTransferService.SelectedGame = new();
    StoreIndexTransferService.OnGamesChanged += OnGameListChangedHandler;
    StoreIndexTransferService.OnSelectedGameChanged += OnSelectedGameChangedHandler;
}
- Unsubscribe the events on component disposing.
public void Dispose()
{
    StoreIndexTransferService.OnGamesChanged -= OnGameListChangedHandler;
    StoreIndexTransferService.OnSelectedGameChanged -= OnSelectedGameChangedHandler;
}
This step is not required by the framework but you must unsubscribe the events in order to avoid memory leaks.
- Use the properties in the transfer service as local properties.
@foreach (var game in StoreIndexTransferService.Games)
{
    <div @onclick="() => { StoreIndexTransferService.SelectedGame = game; }">
        <div>Name: @game.Name</div>
        <div>Price: @game.Price</div>
    </div>
}
Reference change and Value change
In the transfer service of the previous example, in StoreIndexTransferService we have the following code:
public Game SelectedGame
{
    ...
    set
    {
        _selectedGame = value;
        OnSelectedGameChanged?.Invoke(this, value);
    }
}
The OnSelectedGameChanged event will invoke all the delegates associated with it when the setter is triggered. This setter will be triggered when the reference to SelectedGame change like this:
StoreIndexTransferService.SelectedGame = new();
or something like this:
<div @onclick="() => { StoreIndexTransferService.SelectedGame = game; }">
but not this:
StoreIndexTransferService.SelectedGame.Name = "Brawlhalla";
This code will not change the property's reference but its value. The trigger for reference in the transfer service (in this case is OnSelectedGameChanged) will not be fired and all other components subscribed to it will not get the notification. To get the notification when a value changes, you need to put the event inside the model class (in this case is Game) and register to the change event in the transfer service.
Get notifications from Value change
- Set up the event and invoke the event whenever the value changes in the model class.
public class Game : INotifyPropertyChanged
{
    private string _name;
    private double _price;

    public string Name
    {
        get => _name;
        set
        {
            _name = value;
            PropertyChanged?.Invoke(this, new(nameof(Name)));
        }
    }
    public double Price
    {
        get => _price;
        set
        {
            _price = value;
            PropertyChanged?.Invoke(this, new(nameof(Price)));
        }
    }

    public event PropertyChangedEventHandler PropertyChanged;
}
In this example, we use the interface INotifyPropertyChanged implementation. This implementation is fast but you only have one event for all the properties within the class. You can declare one event for each property in the class to have more customization.
- Subscribe to the property change event in the transfer service.
public class StoreIndexTransferService : IDisposable
{
    public Game SelectedGame
    {
        get => _selectedGame;
        set
        {
            _selectedGame.PropertyChanged -= PropertySelectedGameChangedEventHandler;
            _selectedGame = value;
            _selectedGame.PropertyChanged += PropertySelectedGameChangedEventHandler;
            OnSelectedGameChanged?.Invoke(this, value);
        }
    }

    private void PropertySelectedGameChangedEventHandler(object sender, PropertyChangedEventArgs propertyName)
    {
        OnSelectedGameChanged?.Invoke(this, _selectedGame);
    }

    public void Dispose()
    {
        SelectedGame.PropertyChanged -= PropertySelectedGameChangedEventHandler;
    }
}
Always remember to unsubscribe from events whenever you no longer need them to avoid memory leaks in your website.
